 Software Development
 Security Services
 Cloud Services
 Other Services


 TechMagic Academy
Reactive Programming in Rx and Other Cool Things
Head of Marketing at TechMagic. Passionate about startups, digital ecosystem, cloud technologies, and innovations.

For the beginning, I surely recommend to read the official documentation. There you can find the fundamentals for the RxSwift operators. Essentially, in RxSwift everything is constructed around the observable object. From it’s name you could guess that we will observe changes of such objects throughout the whole program.
For the beginning, I surely recommend to read the official documentation. There you can find the fundamentals for the RxSwift operators.
Essentially, in RxSwift everything is constructed around the observable object. From it’s name you could guess that we will observe changes of such objects throughout the whole program. In particular, those objects will notify you about changing their statuses. Moreover, we possess the ability to perform any necessary actions that will alter the returned object (filter, map, flatMap etc).
So the complete workflow looks like this:
Creating an observable with some function. For example, one that holds a single parameter inside and returns an observable object. Furthermore, there is a huge list of other variations. You can check them in the documentation.
Describing its behavior with the use of different operators (if the state was changed). For example, filtering in order to get a result under the specific conditions, or setting a thread to run a result code.
Setting handlers (if required) for each state (Next, Completed, Error).
Subscribing - informing observer about our desire to get its notifications since now.
This code illustrates an example of subscription to some observable object. The devil is not as black as he's painted, so don’t be afraid of it. The sample is really simple, so we will try to explain it step by step. You can easily find all the unknown methods in the documentation. At first, we create Swift OperationQueue. This stage should not cause any difficulties. Let’s directly go to harder issues.
BackgroundWorkScheduler describes the thread for performing actions from the queue on its background. The next part is the most interesting. There is some object that will able to upload videos and we will subscribe on its changes.
- Setting for work should be performed on the background thread and we will handle an initial result on it.
- Transforming object using, “map” method so as to string.
- Starting work in main thread, for UI work
- Setting handle function for the Next state.
We actually executed all these actions in a couple of lines.
let operationQueue = NSOperationQueue()
  operationQueue.maxConcurrentOperationCount = 3
  operationQueue.qualityOfService = NSQualityOfService.UserInitiated
  let backgroundWorkScheduler
    = OperationQueueScheduler(operationQueue: operationQueue)

videoUpload
  .observeOn(backgroundWorkScheduler)
  .map({ json in
    return json["videoUrl"].stringValue
  })
  .observeOn(MainScheduler.sharedInstance)
  .subscribeNext{ url
    self.urlLabel.text = url
  }
Additionally, we can build our own observable object. All we need is to describe how it should behave.
The following example is about object creation. We took it from the RxSwift tutorial on the website of Realm company. The main idea here is composing request to some server. From my point of view, it’s a fairly common task. Thankfully, we can show all RX power within it.
create { (observer: AnyObserver) -> Disposable in

  let request = MyAPI.get(url, ( (result, error) -> {
    if let err = error {
      observer.onError(err);
    }
    else if let authResponse = result {
      observer.onNext(authResponse);
      observer.onComplete();
    }
  })
  return AnonymousDisposable {
    request.cancel()
  }
}
This code might be easily conceived on the basis of previous paragraphs . Still let’s figure it out.
The “create” function constructs an observable object that sends “GET” request to the server. In the body of the code you can notice three common RX states. If something goes wrong, then we will send “Error” state to our observers. Otherwise, if we get a response, we dispatch “Next”, marking that we have changed the state. Finally, we send “Complete”, implying that we finished our work.
The last, but not least, AnonymousDisposable. We use disposables to unsubscribe from a current object. By creating them we describe the action that should be performed after the unsubscription. Similarly, in our example, we easily cancel the request as we don’t have any observers. Seems the same as without reactive? Let us check what benefits we can derive from this tiny piece of code.
We often have to annul the same requests (if such exists) to avoid duplication and improve the app’s speed. In this case, we need to call store completion blocks after a request is done. Frequently we perform it by storing blocks in array and then - in a dictionary with a key, which is something unique and related to our request. Looks pretty hard for such an easy task.
What do we actually get from RX? Any object that subscribes to our new one will be notified about it’s completion. As a result, there’s no need for any other data storages. Convenient and simple. Not enough?
Therefore, let’s consider another problem - “data in chunks”. You might have noticed that we send “Complete” right after the “Next” state. The reason for it is apparent - we received all the necessary data (it was already described). In case we have not enough information, we just send “Next” without “Completed”. “Completed” option should be sent with the last piece of data. All a subscriber have to do is collect data when he gets “Next” and start working with it in case he obtains “Completed”. Easy, isn’t it?
I guess you may find this piece of code simple, so just perform some modifications as I do in these examples.
In the next passage, I will demonstrate some RxSwift operators. As I mentioned before, you can check the whole list in the RxSwift documentation.
asObservable
Converts your object into an observable object (provided your object can be converted).
  let variable = Variable(0)

    variable.asObservable().subscribe { e in
        print(e)
    }
    variable.value = 1
Next(0)
Next(1)
Create
This operator enables full creation of an observable object, using it’s own logic . We applied it in our previous example.
let firstSequence = Observable.of(1, 2, 3)
    let secondSequence = Observable.of("A", "B", "C")

    let multipleSequence = Observable>.create { observer in
        observer.on(.Next(firstSequence))
        observer.on(.Next(secondSequence))
        return NopDisposable.instance
    }
    let concatSequence = multipleSequence.concat()
    concatSequence.subscribe { e in
        print(e)
    }
Next(1)
Next(2)
Next(3)
Next(A)
Next(B)
Next(C)
Deferred
Gives an opportunity to remove time off the process of observable object creation until subscribing on it.
   var i = 1
    let deferredJustObservable = Observable.deferred{
        Observable.just(i)
    }
    i = 2
    _ = deferredJustObservable.subscribeNext{ print ("i = \($0)") }
i = 2
Listed above operators are by far the most widespread. To be clear, RxSwift also has its analogs to work with changing UI, such ass rx_text, rx_enabled etc. The one and only difference between RxSwift and its UI representations is that they are of an observable type and you can subscribe on them to check when such properties will change.
Eventually, I attach the following examples so as to show how to work with UI in RxSwift. Albeit I won’t simply depict it, I will compare the code written with RxSwift and the standard Apple code approach, to underline the benefits.
The following program adds three numbers from text fields and stores the result in a label.
import Foundation
import UIKit
#if !RX_NO_MODULE
import RxSwift
import RxCocoa
#endif

class NumbersViewController: ViewController {
    @IBOutlet weak var number1: UITextField!
    @IBOutlet weak var number2: UITextField!
    @IBOutlet weak var number3: UITextField!

    @IBOutlet weak var result: UILabel!

    override func viewDidLoad() {
        super.viewDidLoad()

        Observable.combineLatest(number1.rx_text, number2.rx_text, number3.rx_text) { textValue1, textValue2, textValue3 -> Int in
                return (Int(textValue1) ?? 0) + (Int(textValue2) ?? 0) + (Int(textValue3) ?? 0)
            }
            .map { $0.description }
            .bindTo(result.rx_text)
            .addDisposableTo(disposeBag)
    }
}
The next sample illustrates the standard approach.
import Foundation
import UIKit

class RealNumbersViewController: ViewController {

    @IBOutlet weak var number3: UITextField! {
        didSet {
            self.connectTextField(self.number3)
        }
    }
    @IBOutlet weak var number1: UITextField! {
        didSet {
            self.connectTextField(self.number1)
        }
    }
    @IBOutlet weak var number2: UITextField! {
        didSet {
            self.connectTextField(self.number2)
        }
    }

    @IBOutlet weak var result: UILabel!


    override func viewDidLoad() {
        self.calculateResultForTextField(number1)
        self.calculateResultForTextField(number2)
        self.calculateResultForTextField(number3)
    }

    func textFieldDidChange(textField: UITextField) {
        self.calculateResultForTextField(textField)
    }

    private func connectTextField(textField: UITextField) {
        textField.addTarget(self, action: #selector(RealNumbersViewController.textFieldDidChange(_:)), forControlEvents: UIControlEvents.EditingChanged)
    }

    private func calculateResultForTextField(textField: UITextField) {
        //        let calculatedValue = (Int(number1.text ?? 0) ?? 0) + (Int(number2.text ?? 0) ?? 0) + (Int(number3.text ?? 0) ?? 0);
        let firstOperand = (Int(textField.text ?? "0") ?? 0)
        let secondOperand = (Int(self.result.text ?? "0") ?? 0)
        self.result.text = (firstOperand + secondOperand).description
    }
}
As you see, there is an immense difference in amount of code written. RX approach allows to get rid of unnecessary conditions. I even tried to use React via overriding setters, but still that does not perform better than the full Reactive style code.
The next example describes password and username validation. Workflow is the following: if a username is not valid, then we can’t insert a password. Supposing a username is proper, but a password goes wrong, then we are not permitted to press a button. The label with a warning text disappears as long as a username and a password are valid
import UIKit

let minimalUsernameLength = 5
let minimalPasswordLength = 5

class RealSimpleValidationViewController : ViewController {
    @IBOutlet weak var usernameOutlet: UITextField! {
        didSet {
            self.usernameOutlet.addTarget(self, action: #selector(RealSimpleValidationViewController.usernameChanged(_:)), forControlEvents: UIControlEvents.EditingChanged)
        }
    }
    @IBOutlet weak var usernameValidOutlet: UILabel!

    @IBOutlet weak var passwordOutlet: UITextField! {
        didSet {
            self.passwordOutlet.addTarget(self, action: #selector(RealSimpleValidationViewController.passwordChanged(_:)), forControlEvents: UIControlEvents.EditingChanged)
            self.passwordOutlet.enabled = self.paswordIsValid()
        }
    }
    @IBOutlet weak var passwordValidOutlet: UILabel!

    @IBOutlet weak var doSomethingOutlet: UIButton!

    func usernameChanged(textField: UITextField) {
        self.passwordOutlet.enabled = self.usernameIsValid()
        self.usernameValidOutlet.hidden = self.usernameIsValid()
        self.doSomethingOutlet.enabled = self.usernameIsValid() && self.paswordIsValid()
    }
    func passwordChanged(textField: UITextField) {
        self.passwordValidOutlet.hidden = self.paswordIsValid()
        self.doSomethingOutlet.enabled = self.usernameIsValid() && self.paswordIsValid()
    }
    func paswordIsValid() -> Bool {
        return self.passwordOutlet.text?.characters.count > minimalPasswordLength
    }
    func usernameIsValid() -> Bool {
        return self.usernameOutlet.text?.characters.count > minimalUsernameLength
    }
}
RxSwift example
import UIKit
#if !RX_NO_MODULE
import RxSwift
import RxCocoa
#endif

//let minimalUsernameLength = 5
//let minimalPasswordLength = 5

class SimpleValidationViewController : ViewController {

    @IBOutlet weak var usernameOutlet: UITextField!
    @IBOutlet weak var usernameValidOutlet: UILabel!

    @IBOutlet weak var passwordOutlet: UITextField!
    @IBOutlet weak var passwordValidOutlet: UILabel!

    @IBOutlet weak var doSomethingOutlet: UIButton!

    override func viewDidLoad() {
        super.viewDidLoad()

        usernameValidOutlet.text = "Username has to be at least \(minimalUsernameLength) characters"
        passwordValidOutlet.text = "Password has to be at least \(minimalPasswordLength) characters"

        let usernameValid = usernameOutlet.rx_text
            .map { $0.characters.count >= minimalUsernameLength }
            .shareReplay(1) // without this map would be executed once for each binding, rx is stateless by default

        let passwordValid = passwordOutlet.rx_text
            .map { $0.characters.count >= minimalPasswordLength }
            .shareReplay(1)

        let everythingValid = Observable.combineLatest(usernameValid, passwordValid) { $0 && $1 }
            .shareReplay(1)

        usernameValid
            .bindTo(passwordOutlet.rx_enabled)
            .addDisposableTo(disposeBag)

        usernameValid
            .bindTo(usernameValidOutlet.rx_hidden)
            .addDisposableTo(disposeBag)

        passwordValid
            .bindTo(passwordValidOutlet.rx_hidden)
            .addDisposableTo(disposeBag)

        everythingValid
            .bindTo(doSomethingOutlet.rx_enabled)
            .addDisposableTo(disposeBag)

        doSomethingOutlet.rx_tap
            .subscribeNext { [weak self] in self?.showAlert() }
            .addDisposableTo(disposeBag)
    }
}
Let’s discuss one more example and achieve these 2 goals:
Improve our thinking in a reactive way, try some RX operators,
Ascertain that pieces of code written with RX libraries on different languages are, in fact, similar and easy to read.
Imagine you’ve passed a long development cycle, all the testing and app polishing are over - looks like you only have to submit the app to the store. It, in turn, requires 3 things to complete:
a new build from developers side,
release notes,
some assets from UI/UX department.
A person who prepares the app for submitting should arrange all 3 parts. For now, we have everything needed. The next step implies translating the issue into the reactive language. There are 4 observables which should be taken into account before the app is on the way to the store:
- releaseObservable - the one, which is observed by all the people, interested in the app’s release (product owner, for instance).
- appBuildObservable - produces the build object, once the build is correctly prepared;
- releaseNotesObservable - issues release notes;
- appStoreAssetsObservable - emits assets needed for the store.
The appBuildObservable is a far more interesting one. We have to test literally each and every build as it can not go live without a QA engineer. Speaking the reactive language, we need to apply filtering to the observable in order to avoid emitting inappropriate results.
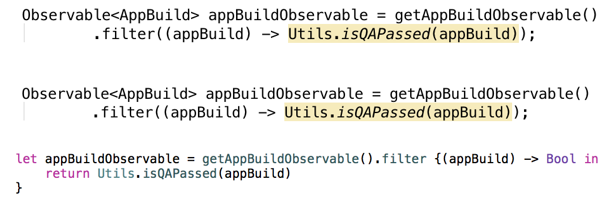
Evidently, we have different observables. How to play with them so as to get eligible results? I would suggest using zip operator for combining appBuildObservable, releaseNotesObservable and appStoreAssetsObservable. It joins the emissions of multiple observables via a specified function and produces single items for each combination.

After we created the resulting observable, we need to subscribe on it and start receiving data. We can determine which thread we want that observable to use to perform the actions(subscribeOn) and on which thread we expect to receive the result(observeOn).
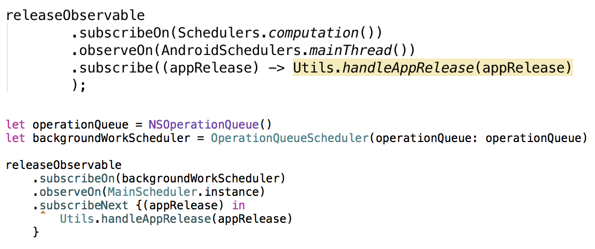
That’s it, received observable will produce new data. Previously mentioned 3 components (new build, release notes and UI/UX assets) will be done on the background thread. The result will be sent to the main thread of the application.
The code snippets, presented above are written on Swift and Java. To my mind, they are extremely easy to read and look very similar. The only disparity is caused by the natural difference between these two programming languages.
Besides, we can write a code that can be read the same way on different languages. Our example is a wonderful proof of that. As reactive programming is not just a library, but a kind of programming paradigm, there are implementations available for the most popular languages and platforms.
Reactive programming makes us first think about organizing data streams and after - how to code. Furthermore, reactive libraries give us the same API and entities in implementations for different languages. Observable, Observer, Scheduler in RxSwift documentation mean exactly the same as Observable, Observer, Scheduler in RxJava and RxAndroid in particular. In other words, building apps in a reactive way brings a lot of benefits if we develop the same app for different platforms. We can build the same architecture model for different OS and only some parts of the app will be written with native approaches.
Conclusion
In my opinion, Rx code is obviously clear, simple and easy to manage. You can actually understand everything without a long explanation.
What is our conclusion? You should answer the following question. Are you interested in using reactive approach now, or maybe it’s not what you are looking for?
As for me, Reactive is a new and powerful direction in building trendy apps. I definitely recommend it.
Prepared by V.Khmil & M.Tys
If you liked this article, share it with friends!


 linkedin
 facebook
 twitter


